
Do you have a colostomy? Well, then we have a great solution for you! There is a very simple solution to better manage your bowel evacuations!
This is colostomy irrigation, a very safe and effective procedure that gives you control over your evacuations and minimizes the problem of foul odor.
This method will allow you to feel more comfortable and enjoy social relationships without worry.
In this article we will explain how and what to do to perform a good irrigation, but first, if you are wondering what a colostomy irrigation consists of, we give a brief explanation:
Table of Contents:
- What is the purpose of colostomy irrigation?
- Who can do stoma irrigation?
- When can I start irrigating my colostomy?
- How often should I irrigate my ostomy?
- When should I irrigate my ostomy?
- How long should the irrigation last?
- In what situations should I not irrigate?
- Colostomy irrigation procedure – What do I need?
- 5 simple steps for the correct colostomy irrigation procedure
- 10 tips to prevent any problems during the colostomy irrigation procedure
- Frequently asked questions
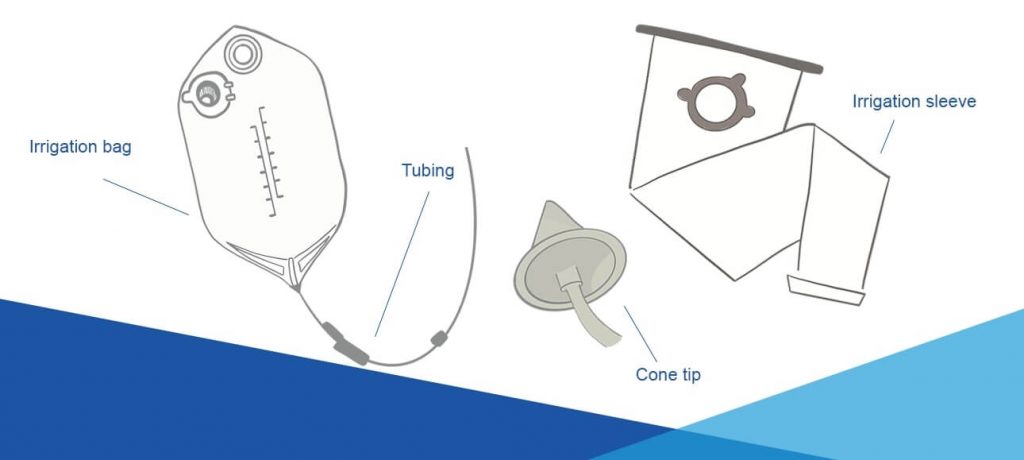
Colostomy irrigation is the process of washing the stoma with 500-1000 ml of water, using an irrigation bag, a sleeve, a tube with flow control, and a cone to insert the water. Once the flushing is done, the stool comes out of the ostomy within an hour. This procedure will ensure that you have no evacuations for about 24 to 48 hours.
What is the purpose of colostomy irrigation?
The purpose of colostomy irrigation is to stimulate bowel movement to better manage evacuations. Through the introduction of water through the stoma opening, you can flush your colon and better manage your bowel movements. This will give you the option of using a small-sized ostomy bag or ostomy cap.
Who can do stoma irrigation?
Suitable candidates for stoma irrigation are those ostomates with permanent colostomies performed in the descending colon or sigmoid part of the intestine. In other words, to do irrigation you must have enough large intestine to produce reasonably formed stool.
Ostomates who cannot irrigate Are those with:
-
- Ascending and transverse colostomy: stools are liquid and frequent evacuations occur. This is why irrigation does not work and is generally considered a waste of time.
- Ileostomy: l‘irrigation for ileostomy is not recommended because you experience very liquid and frequent evacuations. Irrigation could cause you to have an electrolyte imbalance and thus dehydration.
- Urostomy: Also in this case, evacuations are very frequent and liquid.
When can I start irrigating my colostomy?
Some colostomy patients can start irrigating as early as 10 days after surgery, while others may need to wait about 2-3 months after surgery. It depends on many factors such as the type of surgery, medical conditions, and the types of medications you are taking. Ask your referring doctor what might be the best time for you to start this procedure.
How often should I irrigate my ostomy?
Usually, colostomy irrigation must be performed regularly every 1-3 days to be effective. However, the irrigation schedule depends on your body, bowel movement and diet.
So, you can irrigate your ostomy every day, every other day or every third day. The frequency of this procedure is very subjective.
When should I irrigate my ostomy?
Carry out irrigation regularly, always try to do it at the same time. This way your intestines will get used to the irrigation process. It usually takes six to eight weeks for the intestines to adjust to the irrigation routine.
How long should the irrigation last?
The colostomy irrigation procedure takes 60 to 90 minutes. The more frequently you perform the irrigation, the shorter the time needed to master the steps and technique.
However, it is a totally subjective process. Some may take up to three hours while others may finish in less than half an hour.
In what situations should I not irrigate?
Do not irrigate your ostomy if any of the following scenarios occur:
- If you have diarrhea, it may be best to stop irrigation for a few days until your bowels return to normal.
- If you have an ostomy prolapse (your ostomy protrudes) or a hernia (you have a bulge around your ostomy). You will find it difficult, or even impossible, to pass irrigation water through your stoma. In this case it is best to seek medical help.
- If you are undergoing chemotherapy or radiation.
- If you have irritable bowel syndrome, kidney and heart disease.
- If you have physical limitations such as arthritis, paralysis, visual impairment, learning disabilities, or if you have a terminal illness.
- If you have an ascending or transverse colostomy, ileostomy or urostomy.
Benefits |
|
Disadvantages |
|
Colostomy irrigation procedure – What do I need?
The supply list should include:
- Colostomy irrigation kit that includes: an ostomy irrigation bag, an irrigation sleeve, a tube with flow control or clamp, and a cone (a nozzle with a smooth rounded tip). (Colostomy irrigation sets may vary from manufacturer to manufacturer.).
- Thermometer for measuring water temperature. Sometimes supplemented with some types of irrigation bags.
- A wall hanger or any hook to hang the watering bag.
- A colostomy collection system or ostomy cap to be worn after the procedure.
- Paper towels, toilet paper or tissues.
- A gentle cleanser (without fragrance and mineral oils). We recommend using. Bioderm stoma Plus, the only specific cleanser for proper hygiene of your ostomy. Avoid using conventional products that can cause peristomal skin irritation.
- Drinking and lukewarm water.
- An ostomy or irrigation belt (optional).
- Latex gloves (optional).
5 simple steps for the correct colostomy irrigation procedure
Before you start with your colostomy irrigation procedure, consult your doctor or stomatherapist and ask for detailed information about this technique.
Once you are ready to perform this procedure on your own at home, you can use this guide to remember the colostomy irrigation steps.
Step 1: Prepare the equipment
- Connects the irrigation bag, tubing and cone together .
- Close the flow regulator or block the hose connected to the irrigation bag,
- Fill the bag with water at body temperature (37-38 C). If it is too hot, damage to the stoma may occur. If it is too cold, it may cause cramping.
We recommend that you start with 500 milliliters during the first few irrigations. - Hang the irrigation bag on the hook so that the bottom of the bag is at shoulder height (whether you are sitting or standing).
Hanging the bag higher may increase the force of water flow and cause you abdominal cramps, while that a bag too low will provide you with very weak water flow. - Holding the hose above the toilet, open the flow regulator to let water flow into the hose. When water starts to leak out, stop the flow.
- Sit on the toilet or in a chair near the toilet (some ostomates prefer to stand).
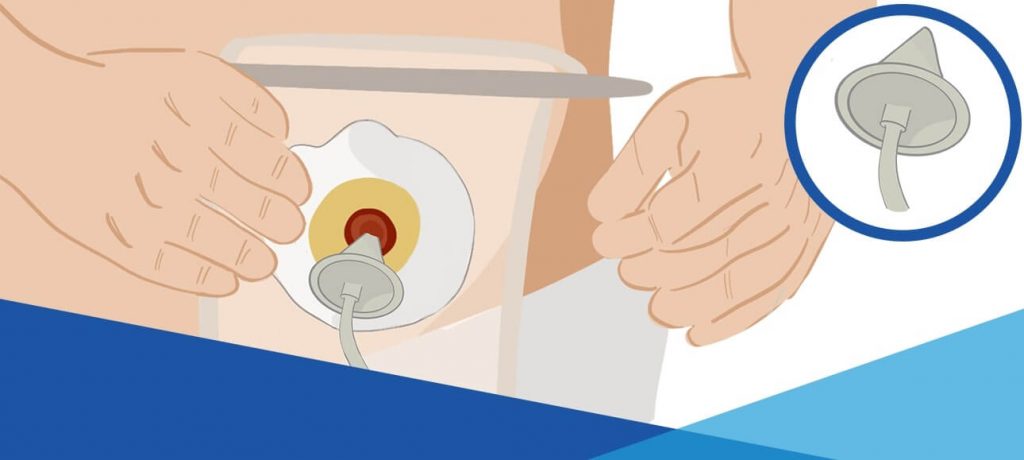
Step 2: Prepare the stoma and insert the cone
- Remove the current collection system.
- Apply the irrigation sleeve to the stoma (which usually comes with an adhesive). Place the opposite end of the sleeve in the toilet, (it should not touch the toilet water). If it is too long, cut it to the appropriate length.
- Lubricate the tip of the cone with a water-soluble lubricant to facilitate entry into the stoma.
- Pass the lubricated cone through the open upper end of the irrigation sleeve and gently push it into the stoma (about one half), without causing you any harm.
Never force the tip of the cone into the ostomy and avoid inserting the entire cone.
Hold the cone in that position for about 1 to 2 minutes while taking slow, deep breaths, which helps relax the abdominal muscles and facilitates irrigation.
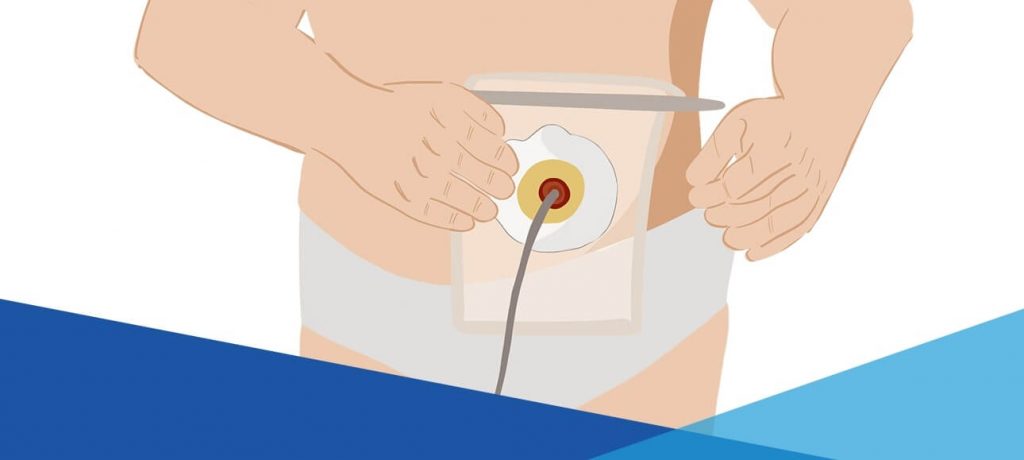
Step 3: Allow the water to flow
- Keeping the cone in place, open the flow regulator and let the water flow gradually and gently into the ostomy.
- It may take 5 to 10 minutes to complete the installation of 500 to 1000 ml of water, after which close the flow regulator.
- Hold the cone in place for about 10 seconds.
- Common problems-how to deal with them:
- If you experience abdominal cramping, slow down or stop the irrigation and try to relax and take deep breaths, and then try the procedure again.
- If water flows around the cone, try gently adjusting the angle or position of the cone tip, and try again.
- If the adjustment did not help, there may be stool blocking the way. Close the flow regulator and remove the cone from the ostomy, and allow the stool to leak out. Next, insert the tip of the cone again and start irrigating.

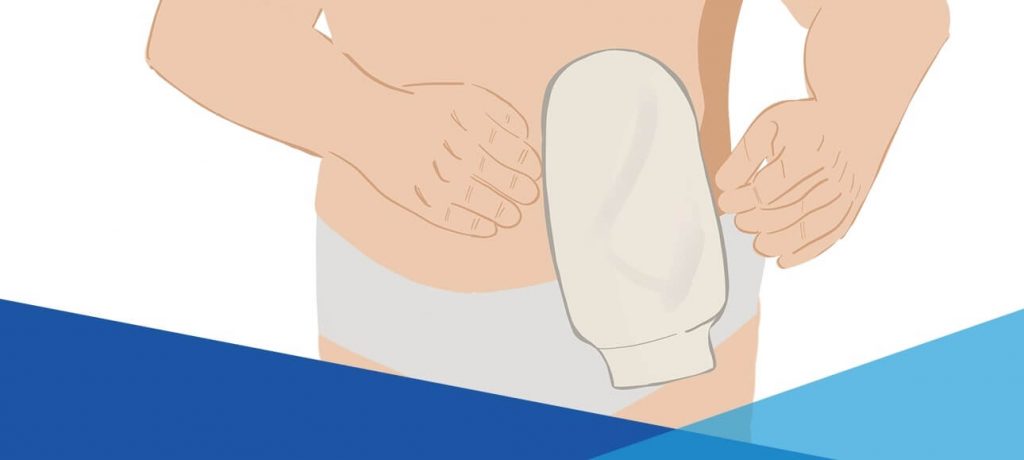
Step 4: Remove the cone and allow evacuation
- Remove the cone and close the top of the irrigation sleeve.
- Evacuations from the ostomy may begin immediately or may take 5 to 10 minutes.
- Let the feces and water flow through the sleeve and into the toilet (during about 15 minutes).
- Close the lower end of the sleeve, wipe it clean, and dry it with a paper towel or handkerchief.
- Now you can leave the bathroom and continue with your usual daily routine, for about 45 minutes. In the meantime, periodic discharges of watery stool will occur, coming out in waves until the colon is completely empty. The entire process should take about an hour.
Step 5: Remove the sleeve (and clean it).
- Empty the sleeve into the toilet.
- Remove the sleeve from the stoma.
- Properly cleanse, rinse and dry the peristomal skin. We recommend using. Bioderm Stoma Plus for gentle and proper cleansing and Bioderm Superabsorbent Wipes er easy and gentle cleansing and drying.
- Apply your collection system or an ostomy cap.
- Wash the sleeve and cone with soap and water to remove any fecal particles. Next, dry them along with the irrigation bag with a paper towel or handkerchief.
- Flush, and wash your hands with soap and water.
10 tips to prevent any problems during the colostomy irrigation procedure
Regardless of whether you are new to colostomy irrigation or are an expert, there are common difficulties for all ostomates.
But with the right practice, the process will become much easier and faster.
The following 10 tips will help you successfully perform your colostomy irrigation:
- Get instruction from a nurse: if you are planning to start irrigation, we recommend that you practice with a nurse to learn the procedure correctly , until you feel confident enough to do it yourself. If you experience problems or difficulties during the irrigation procedure, watch the step-by-step explanation again, or ask your stomatherapist for help to show you the correct technique.
- Inform the family about your routine: choose a time of day when you know you can have the bathroom to yourself, avoiding any disturbance while you do the watering.
- Develop a regular routine, to train the bowels and achieve effective irrigation results.
- During the first attempts at watering, undress so as not to soil clothing. When you feel confident and comfortable with the procedure, do it fully clothed.
- Eat and drink one hour before irrigation.. This promotes bowel movement, which will facilitate the flushing procedure.
- If you feel dehydrated, drink a glass of water and start watering again. When your body is dehydrated, your colon may absorb some of the irrigation water and this may hinder proper irrigation.
- Don’t be in a hurry, respect the time frame of the procedure.
- If you started to feel abdominal pain, cramping and/or nausea during the procedure, take a break for at least two minutes. Any discomfort could be a clear sign that you are introducing water too quickly, or that the water is too cold.
Therefore, stop and take deep breaths for a couple of minutes until you feel better, in the meantime try to figure out what the cause of the problem is, then resume the procedure. - Always keep extra ostomy care on hand when performing your colostomy irrigation.
Although you do your best to prevent and avoid all kinds of complications, unexpected discharge from your ostomy may occur, or you may contract a virus that causes diarrhea (happens very rarely). It is essential that you are always prepared for such emergencies. - Use drinking water at body temperature (37-38ºC). Use a thermometer or test the temperature with your pulse. If you use water that is too cold, you may feel cramps. And if it is too hot, you may damage your ostomy.
For many, colostomy irrigation means a return to “normal” life as they have greater control of their ostomy and bowel movements. In addition, this procedure allows the use of smaller pouches or even the use of ostomy plugs.
So, irrigation will allow you to enjoy greater discretion and personal freedom.
We hope that this guide has helped you learn about this procedure and, most importantly, that it is useful to you.
Finally, remember to take care of the peristomal skin. In fact, ostomised people often face even severe skin changes due to improper hygiene routines, which cause itching, pain and make them feel more uncomfortable showing those parts of the body, for example at the beach or in intimacy, because they are irritated. With a proper hygiene routine, including ostomy-specific products, you will see noticeable improvements in the skin, which will remain smooth and elastic.